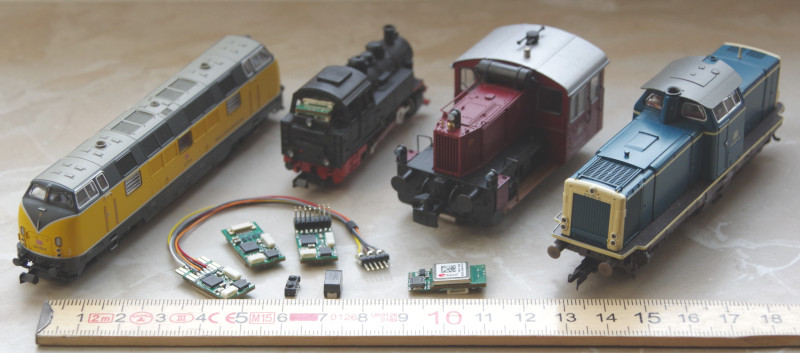
The image shows the variants NEM-651, NEM-652, Next18, and PluX16 (from left to right).
The CTC-Loco-Module-S3 (small) is optimized for locos starting from scale N and is available in the following variants:
- with standard plug Next18 ,
- with standard plug PluX16 ,
- with 6-pin pin header according to NEM-651 ,
- with 8-pin plug-in board according to NEM-652 ,
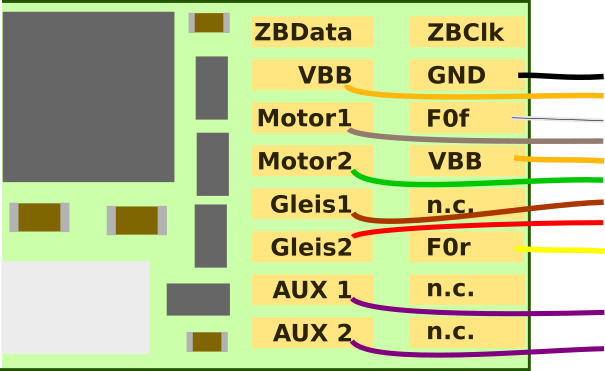
- with cables for track, motor, lighting, and up to 2 AUX connections,
- with solder pads for track, motor, lighting, and up to 2 AUX connections,
- with cables for connecting a DCC decoder .
The variants with standardized plugs can be installed without soldering. For converting older (including analog) locos, you can use the variant with cables or solder pads. In our own analog conversions , the variant with solder pads has proven itself, which is why we now also offer it in the shop.
| Property | Description |
| Optimized for | Locs from scale N with PluX16, Next18, NEM-651, NEM-652 or for soldering |
| Dimensions | 20 x 10 x 4.2 mm |
| Processor | Espressif ESP32 (u-blox NINA-W106) |
| Input voltage | approx. 9 V to 16 (or 24 V) DC or digital current or AC (with buffer capacitor) |
| Motor output | 1x DC motor: continuous current approx. 1.0 A, peak 3.5 A |
| Switching outputs | 4x 500 mA half-bridge (F0L, F0R, AUX1, AUX2) |
| Total current max. | 2 A |
| Interfaces | MicroSUSI, CTC-IR receiver, train bus (e.g. as I2C), 2x servo, 1x input |
| Online passive power | TBD |
| Boot power | 50 mA at 15 V |
Buy now: Next18 PluX16 NEM-651 NEM-652 Cables Solder pads DCC
In the overview "CTC-Loco-Modules " you will find further loco modules and links to installation instructions.
Connection
Notes:
- When choosing the input voltage, please remember that motors, lamps, etc. connected to the CTC module, as well as the buffer capacitor, must be able to handle this voltage The compact capacitors limit the input voltage to a maximum of 16 volts.
- For PluX16 and Next18, the train bus can be used as a SUSI interface.
To connect:
- plug the CTC module into the appropriate socket of the locomotive or solder the cables.
- connect or solder the buffer capacitor.
- plug the optional CTC IR receiver or NFC reader into the 6-pin socket on the CTC module.
The assignment of the lighting and AUX connections to switches in the app can be freely configured (cfg.xml).
IR Receiver
We supply you with a cable with a suitable 6-pin plug for the IR receiver.
The socket on the module is a JST SM06B-XSRS-ETB. We also use this socket for flashing the module via an FTDI cable. The pin assignment is as follows: 1-Reset, 2-Flash, 3-GND, 4-TX, 5-RX, 6-VCC.
Buffer Capacitor
The buffer capacitor is plugged into or soldered to the 4-pin MicroSUSI socket. The white bar on the capacitor marks the positive pole (VBB).
For soldering, we use an orange cable for the positive pole (VBB) and black for the negative pole (GND). For Next18, the cables are soldered to the two solder pads on the processor side:
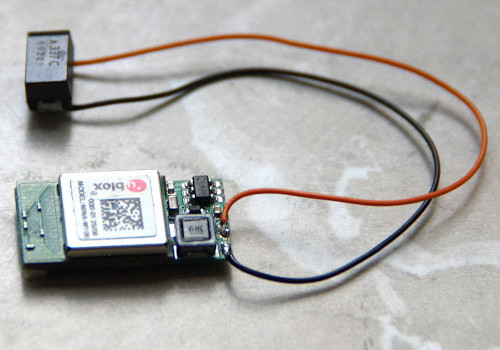
For all other variants, we use the VBB and GND pins of the PluX16 plug (see below).
Optionally, we can supply the CTC-Loco-Module-S3 already with a soldered capacitor.
Pin Assignment PluX16, Cables, Solder Pads
Details on pin assignment and dimensions can be found in the respective standards (see above).
The cables are soldered to the corresponding pins for the PluX16 plug: