





The CTC-Loco-Module-G2 is optimized for installation in G-scale and garden railway locomotives. Locomotives with many functions benefit from the two motor connections, 10 switching outputs and 2 servo connections of this loco module. Additionally, a SUSI3 sound module can be connected.
| Property | Description |
| Optimized for | Garden railway locos, locos with high power consumption, locos with 2 motors |
| Dimensions | 81 x 30 mm (older loco module-G 78 x 30 mm) |
| Processor | Espressif ESP32 |
| Input voltage | approx. 9 V to 24 V DC, digital current or AC (with support capacitor) |
| Motor output | 2x DC motor: peak 6 A or 3.5 A |
| Power outputs (SW) | 6x 1.2 A LowSide |
| Half-bridges (HB) | 4x 2.5 A (older loco module-G: 4x 1.0 A) |
| Servos | 2x (require external power supply or additional board) |
| Total max. current | 15 A |
| Interfaces | CTC-NFC-Reader, 2x sensor input (opto-coupler), CTC-IR receiver |
| Sound | SUSI3-Classic (older loco module-G with adapter on servo pins) |
| Passive online current | 35 mA at 22 V |
| Boot current | 50 mA at 22 V plus switching current for output initialization |
The CTC-Loco-Module-G2 is available in two variants with different driver chips:
- for two motors with 3.5 A peak eachBuy G2-3.5A now
- for two motors with 6 A peak eachBuy G2-6A now
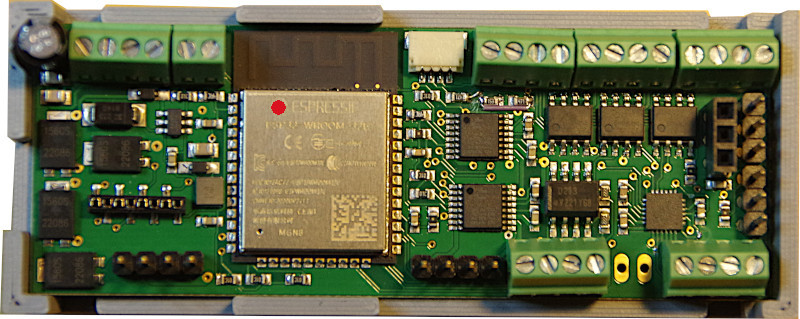
In current LGB locos, the motor blocks (including track contact) are connected via a flat ribbon cable with a socket in 2.54 mm pitch. For this, the CTC-Loco-Module-G2 offers a variant where two screw terminals are replaced by matching pin headers.
- The older CTC-Loco-Module-G1 (without SUSI) is only available in the 6 A peak variantBuy G1-6A now
In the overview "CTC-Loco-Modules " you will find further modules and links to installation instructions.
Pin assignment Loco-Module-G2
The pin assignment of all four variants of the CTC-Loco-Module-G2 is identical. The different driver chips can only be identified by the printing on the chips. We mark the 3.5 A variant with a red dot and the 6 A variant with a green dot. Here is the universal variant with screw terminals:
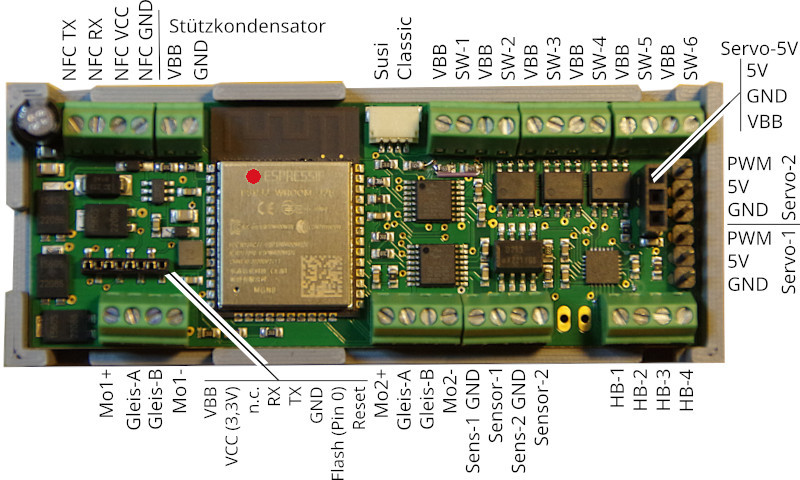
Here is the variant intended for newer LGB locos with pin headers for motor and track connections:
Pin assignment (older) Loco-Module-G
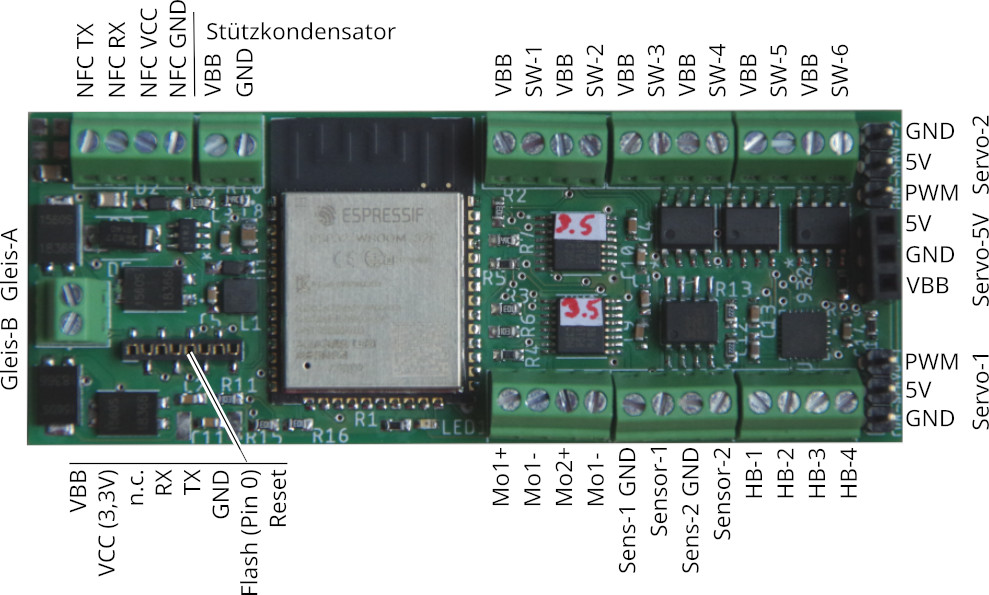
Notes on the old Loco-Module-G:
- The pin labeling for "Servo-5V" was incorrect (VBB and 5V swapped) until 19.06.2023 In CTC-Loco-Modules-G delivered before 09.07.2021, the SW connections were swapped in pairs. This can be corrected via software configuration.
Connection
Notes:
- When selecting the input voltage, please remember that motors, lamps, etc. connected to the CTC module must also be compatible with this voltage
Standard configuration
- Connect the track-A and track-B contacts to the track or power supply. It does not matter whether they are supplied by an analog transformer, a digital control unit or a power supply, as long as the maximum voltage of 24 V is not exceeded. Since there is a rectifier at the input, it does not matter which pole you connect to track-A and track-B. However, both track-A and track-B connections must each be connected to the same track contact .
- Connect the support capacitor (electrolytic, min. 400 uF, recommended 6800 uF) to VBB (positive pole) and GND.
- Connect the motors to Mo1+ and Mo1- (or Mo2+ and Mo2-).
- Connect the negative poles of lights to one of the SW-x connections. Connect the positive pole to any VBB connection.
- Optionally connect other SW connections, e.g. to the negative pole of the electric coupling, the smoke generator or additional lighting. Connect the positive pole to any VBB connection.
- Connect the CTC-NFC-Reader to NFC-RX, NFC-TX, VCC and GND.
- Insert the SUSI3 sound module into the SUSI3-Classic socket.
The assignment of pins to switches in the app can be freely configured (Cfg.xml).
Additional connections
For servos, e.g. to raise and lower pantographs, you need a separate 5V power supply. You can purchase suitable boards from us.
Connecting the servos:
- Plug the power supply board onto the pin header strip. Make sure the correct polarity is observed.
- Plug the servos onto the pin headers. Also make sure the correct polarity is observed.
The assignment of servos to switches in the app can be freely configured (Cfg.xml).
Mounting bracket
The CTC-Loco-Module-G and -G2 is always supplied with a mounting bracket. The photo shows the CTC-Loco-Module-G:
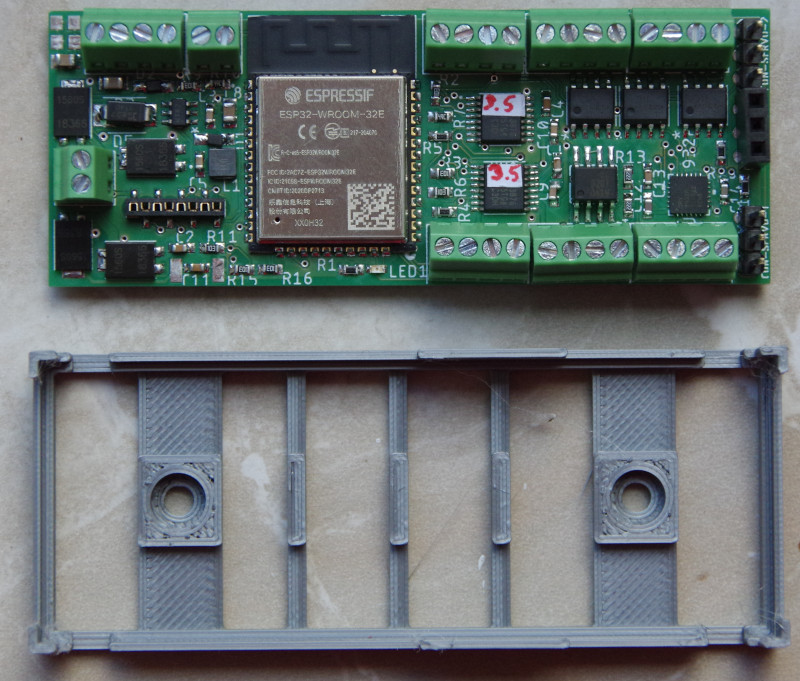
The distance between the screw holes is 49 mm, as with the lead weight of the LGB Köf (D10).